Tuesday, April 29, 2014

Cedar Adirondack Style Side Table

Cedar Adirondack Chairs.  It has been a great project.  It pushed me, made me think, tried my patience and gave me a great sense of satisfaction.  I learned a lot about what made for a comfortable chair.


The easy route would have been to just find some ready made plans and purchased them.  However, that would not afford an opportunity to ask questions.  If you do not ask the questions, then you certainly will find no answers.  Sometimes you have to ask yourself the hard questions.

Do I want this build to be quick and easy?

OR

Do I want this build to make me better for having done it?

If I would have answered yes to the first question, then I most certainly would have built the chairs differently.  The word easy is an attention grabber.  Everyone wants easy.

Easy weight loss
Easy hair removal
8 minute abs...cause 8 minutes is easy

Even this website I named, Simply EASY diy.  However, I did not throw the word easy in the name because I felt that is what the projects I choose to feature were going to be.  I did it to signify a choice.  Choosing to push yourself, learn things you may not know and be better at the end of the day than you were at the beginning, should always be an easy one.

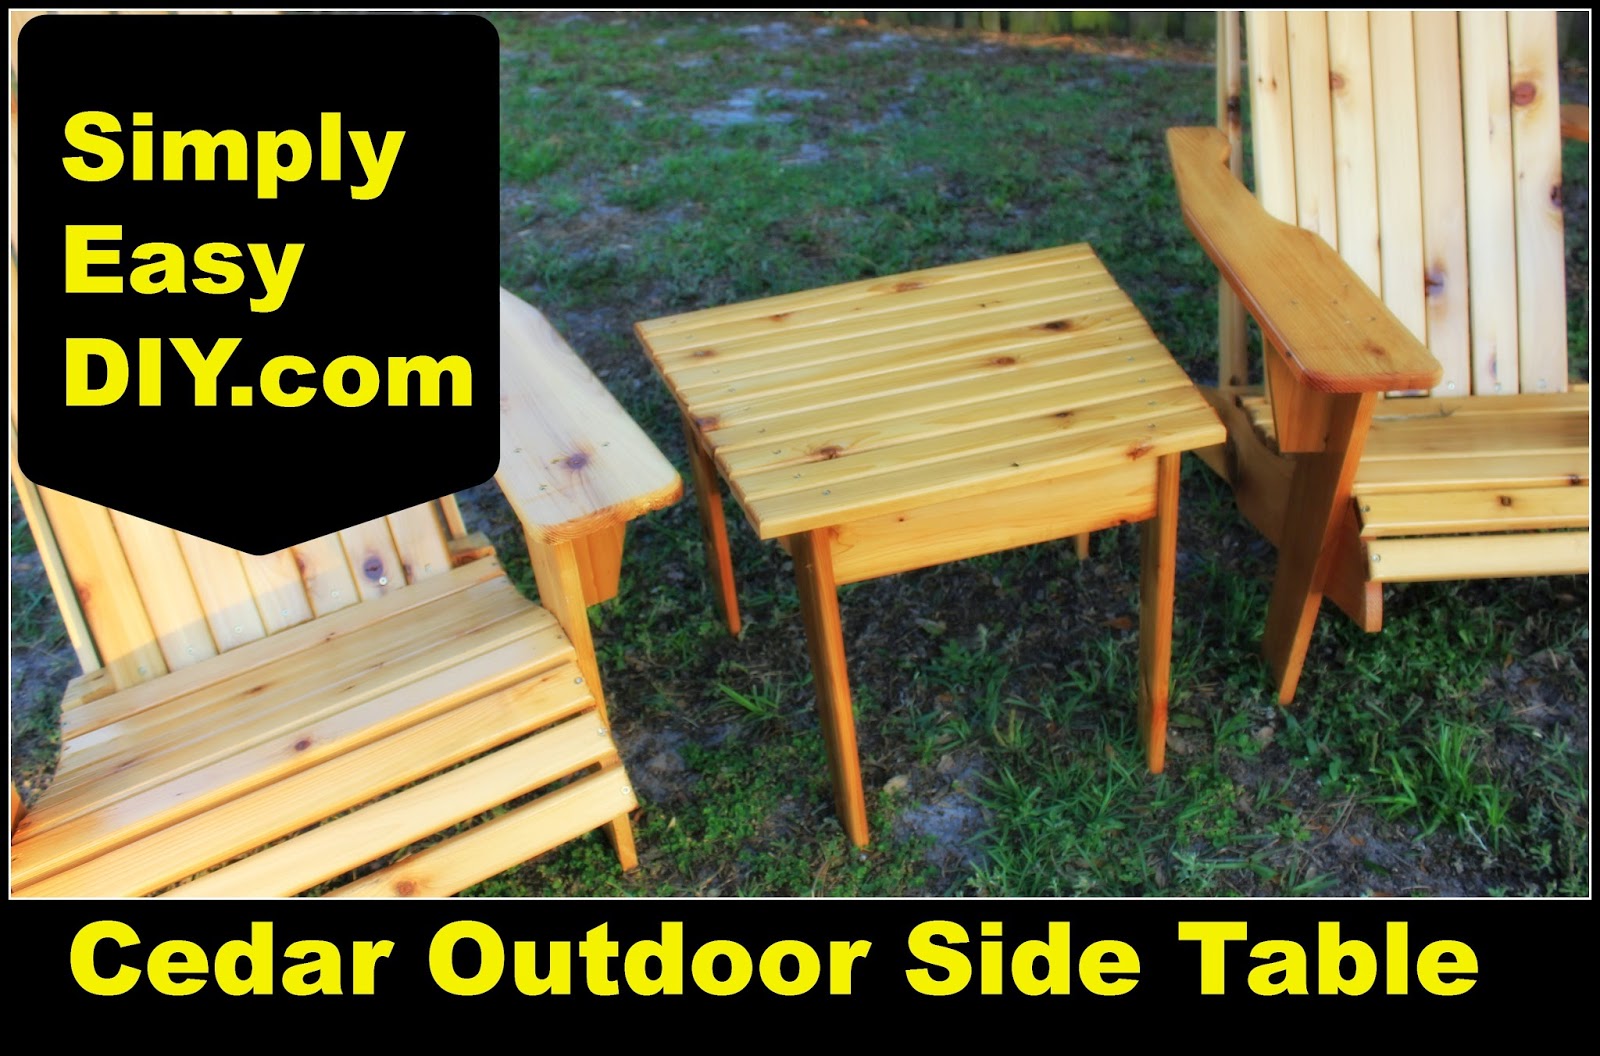
I could have built a square side table.  A few cuts here.  A few more over there.  Done.  However, my belief is if your going to do it yourself; take a step away from easy and add a simple layer of complexity to a project.  It can add so much to the end result.

In the case of this cedar Adirondack style side table, a simple 10 degree angle is all it took to add a more inviting look to the whole set.


Materials:


3 - 1x4x8 cedar boards

1-1/4" screws


Cut List:


Top Slats

10 - 1-11/16" x 24" (5 1x4's ripped in half)


Legs

4 - 1x4's @ 17"


Aprons

2 - 1x4's 12.25

1 - 1x4's @ 19-1/2"

1 - 1x4's @ 13-1/2"

Be sure to check me out on YouTube, Facebook and Pinterest.  You can find those links in the side bar at the top of the page.  I love to see projects that others have done so visit my contact page and shoot an email.  Lets admire your good work together.

Remember to have fun and happy DIY'ing.
0

Friday, April 25, 2014

DIY table saw workstation - Cut list and Materials


It has been almost four months since I started the upgrades to my mobile table saw workstation.  If this is your first time here or if you missed any of the upgrades and corresponding videos, here you go:
14

Saturday, April 19, 2014

Cedar Adirondack Chair and Patio Set Part 3


This is part 3 of the Cedar Adirondack Chair and Patio Set build.

If you missed Part 1 Click here!

If you missed Part 2 Click here!


So far we have covered the cutting and shaping of all the parts.  We have even started some of the assembly.  Next come the front legs.  Just make sure the cut that I pointed out in part 2 is flat on a level surface and clamp the front legs to the seat frame.


To make sure both front legs are even, I used the front of the third seat slat as a reference point.


After I have the legs clamped in place I’ll predrill 3 holes.  Countersink.  Secure with one and a quarter inch screws.  Same thing for the other side.


  Remove the clamps and attach the lower back support brace.


Next I’ll attach what I will refer to as the rear legs.  Mine do not make contact with the ground, although in some designs they do.  Common practice would have these perpendicular to the ground.  Which would allow for that contact.  However, that leaves you having to figure an unknown angled cut at the top in order to attach this upper brace.  So I decided to swing the bottom of my legs forward and make it parallel to the seat back in order to eliminate having to figure what the angle would be.  Also by doing that it allows me to set the recline of the chair later in the project instead of having to do it now.


I am only going to place one screw on the bottom at this stage.  More will be added later when I set the angle of the seat back.  For the upper back support brace I’ll place it flush on top of the lower one and mark where the legs are.


Now when I attach it to the top I’ll line the legs up with those marks.  The arm rest braces I cut from 1x4’s and the length is personal preference.  I have seen these extend down the length of the front legs before, its up to you.  I cut a slight angle on mine in order to stay in step with my overall design.  I’ll mark from below the armrests where the front leg and brace will be.


Then I’ll flip it over onto a scrap piece and predrill holes inside those marks.  The scrap piece is to minimize any major tear out on the top side of the armrest.


Then flip it over and countersink from the top.  Take it back to the chair.  Realign those same marks from the bottom.  And attach with one and a half inch screws.


The second armrest is done the exact same way only I want to make sure the overhangs match.  To attach the seat slats I started with the middle one marking the center of the back support.


Then the two outside slats.


Then I just made sure the rest of the slats where equally spaced.  I held off attaching the rear armrest braces until I had the angle of the seat back set to where I wanted it.


Set the final screws in the bottom of the rear legs.


Attaching the seat slats and cutting this curve was not as simple as laying the slats next to each other on a flat surface and drawing an arc like I showed you in part 2.  Because that wouldn’t take into account the curvature of the seat back.  Now I could have left the back slats as they are and called this done.  However, this is where I decided to mark my radius.


Remove the seat slats.  Make the cuts on each piece.  Sand if I needed to.  Reattaching was easy as I already had the reference points.  After that secure the bottom of the back slats.  I made two chairs.  One of them I just ran the back slats straight up and down.


The other one I attached in the same manner I just showed you however, at the bottom I pushed everything together and it gave me more of a fanned look.


Also the second one has more of a recline to the back and is a little wider.

Materials:


2 - 1x6x8 Cedar Boards

5 - 1x4x10 Cedar Boards

1 - Box of 1-1/4" screws

1 - Box of 1-1/2" screws


Cut List:


2 1x6 Seat Frames @ 36"

2 1x6 Front legs @ 20"

2 1x4 Rear Legs @ 26"

1 1x4 Upper back support brace @ 19"

1 1x4 lower back support brace @ 19"

12 Seat Slats @ 1-11/16" x 19" (a 1x4 ripped in half)

7 Back Slats @ 2-1/4" x 35" (2 1x4's glued together and ripped into 3 equal parts gives 6.  The seventh one I ripped from a single 1x4.)

2 1x6 Armrests @ 31"

2 1x4 Front armrest braces @ 6"

2 1x3 rear armrest braces @ 4" (I used scraps of 1x4 ripped to width and cut to length instead of buying a single 1x3 piece of cedar.)

If you should happen to make a few of these for your family, don't be shy.  Lets admire the good work together.  Visit my contact page and shoot an email.

You can also find me on facebook and Pinterest.

Have fun and Happy DIY'ing

2

Cedar Adirondack Chair and Patio Set Part 2


This is part two of the Adirondack chair build.  If you missed part one.  You can click right here.

So far we have covered the arm rests, the seat frames and the seat slats.


I’m now going to cut the back slats, the ones that will run vertically, to rough length on the miter saw.  I need 7 back slats.  I’m going to edge glue two 1x4 pieces together and then rip these down to the width that I want later.

While those are drying in the clamps I’ll go back to the miter saw and cut two back frame pieces.  These will get a radius cut into them to accept the back slats.  Now a quick Google search for “How to figure the radius of an arc” will yield 7,760,000 search results.  Any number of those will provide a calculator and do the dirty work for you.

Here is a link to the calculator I used.

I wanted to come in 3/4" on each side of the board so I subtracted 1.5" from 19" (the length of my board).  I then plugged in 17.5 into the calculator for the width and 2" for the height.  That gave me a radius of 20.140625".

So I’ll mark the center of my board.  Then measure two inches up from the center.  From that cross point I’ll measure 20 and one eighth inches perpendicular to the board. 


In case you haven’t noticed, this doesn’t have to be perfect or exact.  In fact, you could hand draw this if you wanted or break out an oversize compass and make it perfect.  Just for the sake of variety, I’m using the band saw to cut the radius.  The jigsaw would be completely acceptable.

 
I’m going to smooth out the band saw blade marks at the drill press.

 
Those are done and I’ll set those aside and go back to the miter saw and cut the back legs.  The front legs are next and I’ll switch to the table saw miter gauge to cut them both at the same time.  I’m going to make some tapered cuts in all four legs.


No scientific measurements here, simply what feels right.  I'll connect two marks and line the boards up on the tapering jig.  Same process for the back legs.


Remember those back slats in the clamps?  Those are dry.  Lets take them out and rip them to width on the table saw.  I’ll get three back slats out of each of the two glue ups about 2 and a quarter inches wide.  I’ll rip that last one out of a 1x4 and the off cut piece will be used later in the project.  I have figured this all out to have very little waste.

I forgot to round over the edges of the arm rests when I rounded over the edges of the seat slats, so I’ll do that now before I start assembly.

I have set up two stop blocks on the drill press.  Because these screws are so close to the edge I think it’s imperative to predrill these holes.  One of the drills is set up with a countersink bit and the other with the bit I will need to drive the screws.


I'm using a couple of screws as spacers for the seat slats.


After attaching the seat slats you should have something that looks like this.


 We will finish up the Adirondack chair in part 3.

If you have not seen the video for Part 2 yet you can watch it at the top of this page.  Don't forget you can find me on Youtube, Facebook and Pinterest.

Happy DIY'ing
0

Friday, April 18, 2014

Cedar Adirondack Chair and Patio Set Part 1

I went to the kitchen.  Opened up the cupboard and grabbed a glass.  I walked over to the refrigerator, dispensed some crushed ice and filled it with some iced tea.  Here in Florida we have a limited number of days that you can sit outside during the day and not bake like a roast chicken.  I was determined to enjoy as many of these days as I can.

Walking outside to the backyard I felt the warmth of the midday sun on my face but it wasn't oppressive.  I was going to enjoy sitting down and taking in a little light reading on my kindle fire.  I set up one of our lawn chairs we had purchased years earlier at one of the big box retail stores.  I forget which one.

I found a nice level spot on the ground for my glass of iced tea and slowly lowered myself into the chair.

POP!!

CRASH!!

THUD!!

The chair had broken and I found myself on the ground alongside my glass of spilled tea that was now making a slop of mud.

Yep, its time for some DIY patio chairs.  Cedar Adirondack Chairs to be exact.


The Adirondack chair is the perfect center piece to that summertime do nothing excursion.  The basic design has been around for over a hundred years and originally was for use in the Adirondack mountain region in upstate New York.   It did not have a curved back or a contoured seat.  Those features were added later in 1938.  

Early on in the research for this project I realized that I needed to understand the why’s and how’s of the Adirondack chair.  Often times I don’t use woodworking plans to build a project.  Because I find they prevent me from answering just those questions.  You get into the habit of just looking at a piece of paper to find your next measurement.  Instead of asking the bigger questions, such as, does it matter how long I cut the seat frames and if it does, why?


The answer to the first part of that question by the way is, a little bit.  The shorter you cut the seat frame the further up you want to place the front legs.   If you don’t your chair will be front heavy and have a tendency to tip forward on you when you get in and out of it.

As we go along in this project I will point out some of the measurements I found to be more crucial than others.

The first thing I wanna do is create some templates.  I’m using some scrap ply to rip two 5 and a half inch pieces.  One will be used to shape the armrest.  The other for the seat frame.  Now you don’t have to use templates from scrap wood.  You could cut and shape the armrest and seat frame from the material that you are using and then use that piece to shape the second one.  The process would be exactly the same.

I’m using an old school technique of drawing a one inch grid on the blank then I’ll draw the contours of the pieces.  Doing it this way allows me to see the awfulness before I cut it to something I don’t like. 


One thing about cutting with a jigsaw is that the blades have a tendency to deflect.  A few good ways to avoid that is one; use a good quality blade and the right one for the material your cutting through.  Two use the right setting for what your trying to do.  The different settings on a jigsaw determine how aggressive the cut will be.  The more aggressive, the faster you can cut, but that also means a sloppier cut.  A less aggressive setting means more accuracy but you need to take it slower.  Often times people get impatient and try to push too fast thru the cut and that is when you get blade deflection.  So if your uncertain, cut further off your line and sand down later.

A few things I’d like to point out on the seat frame.  I tried to cut down on some of the bulkiness of the profile by eliminating material where I thought it wouldn’t compromise the strength of the chair.  Here and then by tapering this top portion.  Also, this cut here is what determines the angle the seat will be. 
  
 
So now I have both my templates cut and shaped how I want.  I’ll mark and cut those pieces to rough length on the miter saw.  Place the template on top of the piece I just cut and trace the lines.  Remove the template and its back to the jigsaw.  


I’ll stick the template back on top of the workpiece and route to final shape with a flush trim bit.


After repeating the process for all four pieces, two armrests and two seat frames, I’ll move on to the seat slats.  Mine are 19 inches, so I’ll set up a stop block and make my cuts.  I’ll cut 6 pieces of 1x4 material on the miter saw.  Then I’ll rip those in half on the table saw. 

 
I’ll take those seat slats over to the router and with a round over bit, smooth over the edges.


The cutting and shaping of all the parts is what took the longest.  But I figured if I took my time and did a good job here.  Things were going to go smoother later in the project.

If you have not checked out the Cedar Adirondack Chair and Patio Set Part 1 video yet, you can watch it below.

As always if you have any questions feel free to ask.

Happy DIY'ing


0

Finishing the Cedar Adirondack Chair and Patio Set

This past week was a busy one. Editing the massive amount of video from the Adirondack chair project.  There was a ton of video footage to sort through.  It was a challenge to organize it in a concise way and so the ultimate decision was to break it up into multiple video segments for better presentation. I successfully got Part 1 published, only to have to take it down again due to a technical error. Thankfully, part 1 of the Cedar Adirondack Chair and Patio Set build made it back onto Youtube without too much time elapsing and part 2 was able to be published in time for the weekend.

Part 3 of the Cedar Adirondack Chair and Patio Set build was posted Thursday evening and it felt good to finally finish that aspect of the project.

I have always found the easy part of a woodworking project to be the actual building.  It is the culmination of planning and preparation.   The more planning and preparation you do, the smoother the building stage goes.  You can step back from all your hard work and admire the planks of wood that used to be but are no more.  You have created something.  However, now is not the time to let your guard down.  Now you have to decide what you want the future of this project to be.

Yes cedar is very resistant to rot and mildew.  That along with its abundance and relatively reasonable price is why it is one of the first species of wood used for outdoor projects.  However, just because it is resistant does not mean it is impervious.

A few other reasons you may want to consider protecting a cedar project might include:

1.  It turns a weathered grey color.  That deep rich amber red color that makes a project look so desirable at first will soon turn to a dull grey.  Which is fine if you like greenish grey.  However, if why you choose cedar in the first place is the rich color.  You will want to protect it.

2.  Cedar tends to splinter easily.  The wood grain is not a tightly compacted grain pattern like you might see with a hardwood species such as oak.  Its fibers are easily split.  Add to that the expansion and contraction that any species of wood will undergo, especially when left outside, and you might be picking a few splinters.

3.  Because of the aforementioned expansion and contraction and the use of screws in a project such as an Adirondack chair; the wood around the screws will loosen over time and could potentially weaken the overall strength of the chair.  This could happen despite the wood being completely rot free.

I have decided on a spar urethane satin finish.  Some may argue or otherwise disagree with this decision.  One might say that despite the manufacturer's recommendation that it is for the protection of outdoor wood projects it just doesn't hold up.  I would disagree.

I recently had an opportunity to meet with and talk to a local maker of Adirondack furniture.  He had a display that had been left out in the driving rain and harsh sun for going on three years.  I commented to him how it looked like he had just built it.  I was surprised to learn how old they were and that he hadn't done anything to them beyond the initial application.  What did he use?  Spar urethane.

 As is the case a lot of times with finishes, it is not just about the product or brand that is used.  The application process is often times very critical.  That is not to say that all finishing products are the same.  They are not!!  However, I think you'll find that you can get very good results from a lot of different techniques and products that are on the market.  Spar urethane to polyurethane, brushing versus spraying.  A lot of people will swear by a technique or brand based on what they feel to be most important to them.  I say find out for yourself.

I sprayed three coats of Spar urethane.  It was a hot and sunny day with mild humidity and I was able to apply the three coats in about 6 or 7 hours.

I do not sand between each coat.  I know, sacrilege.  One, this is an outdoor project.  Two, who has forever to devote to sanding?  After the second coat is dry to the touch, I run a 220 grit sandpaper across to take off any roughness and raised grain.  If you go to early or to heavy with the sandpaper you are going to sand that raised grain right back into the finish.

Keep in mind I sprayed the finish on.  The coats are very thin.  If I were brushing on the finish I would do things a little differently.  However, that is a subject for another post.


 I hope you enjoyed this series on the Cedar Adirondack Chair and Patio Set build as much as I enjoyed presenting it.  I can't wait to start my next project.  

Thanks for your support and as always if you have any questions, feel free.

Happy DIY'ing.

0

Will the real radish plant please step forward!

I have come to enjoy the simple pleasure of gardening.  Seeing what a plant can be if left untouched is sometimes an eye opening experience. 
0
http://www.simplyeasydiy.com/search/label/Beginners