

A charging station is an essential piece for any shop. If you have cordless tools, then you have batteries that need charging. If you currently do not have a central place that you do all your charging chores, this will change the way you look at cordless tools.
This particular design may look familiar if you have watched any of my YouTube videos. You can see it hanging on the wall in the back ground.
Made from 3/4" Pine Plywood, it features four slots for cordless drills along with a built in spot for a power strip. The next tier up has two eight inch wide side shelves. I keep my tape measures, a glue bottle and my most commonly used driver bits on one side. The other side usually seats my extension cord for easy access when I need it.
Two shelves on the interior of the unit houses the charging units for my tool batteries. They go on the bottom. When they are done charging I will move them to the shelf above so that I know which batteries are ready to use.
The top tier has two slots cut on either side so that I can place my circular saws and have them sit flat.
DIY: Cordless Tool Charging Station

TIPS: The following measurements may be substituted.
1.5" = 1x2's
2.5" = 1x3's
3.5" = 1x4's
5.5" = 1x6's
Use caution working with solid lumber wider than 1x6's. Especially soft woods such as pine. I find they show a greater propensity to warp, twist and cup. Gluing boards side by side, otherwise known as a glue up, will offer greater stability across the project.
Cut List
3 - horizontal pieces @ 31" x 12"
2 - vertical pieces @ 18" x 12"
2 - vertical lower pieces @ 6" x 12"
1 - middle shelf @ 13.5" x 12"
Step 1
Cut the top piece to length and width. On the right, measure two inches over from the side and an inch back from the front. The slot for the circular saw blade is nine inches in length. Drill the two corresponding one inch holes and use a jigsaw to cut between the two holes.
The circular saw slot on the left needs to be further in than two inches. I measured 5" from the left, but you will want to measure the base of your saw to make sure that measurement works for you. Of course if you only have one circular saw then you may not feel you need to cut the second slot.
Flip the piece over and measure eight inches over from either side. Route the two corresponding dadoes from front to back.

Step 2
Measure eight inches from either side and route the two corresponding dados on the top of the middle horizontal piece just as you did for the top.
Eyeball a spot between the two dados and drilled a one inch hole to pass power cords through.
TIP: Clamp the top and middle horizontal pieces side by side and route the dadoes in both pieces at the same time.

Step 3
Make a series of measurements that are 4-3/4" inches apart going from left to right on the bottom piece. Measure nine inches back from that mark and drill a 1-1/2" diameter hole at each of the measurements.
Use a jigsaw to cut the rest of the slots in the bottom. You can use a router with a round over bit to round over the edges of the slots for the cordless tools. I highly recommend this because the edges can be hard on your tools as you take them in and out of their slots. They can also be hard on your knuckles.

Step 4
Now all the horizontal pieces are cut and shaped. Apply glue to the dadoes routed in the top piece and fit the sides in place.

Step 5
Apply glue to the dado of the middle piece and fit the sides into those slots. At this point I would square the piece up, apply clamps and wait for the glue to dry. Because their is no back piece to add rigidity, it will be "floppy" until the glue dries.

Step 6
When the glue is dry, flip the unit upside down and attach with pocket hole screws the lower sides to the middle horizontal piece.
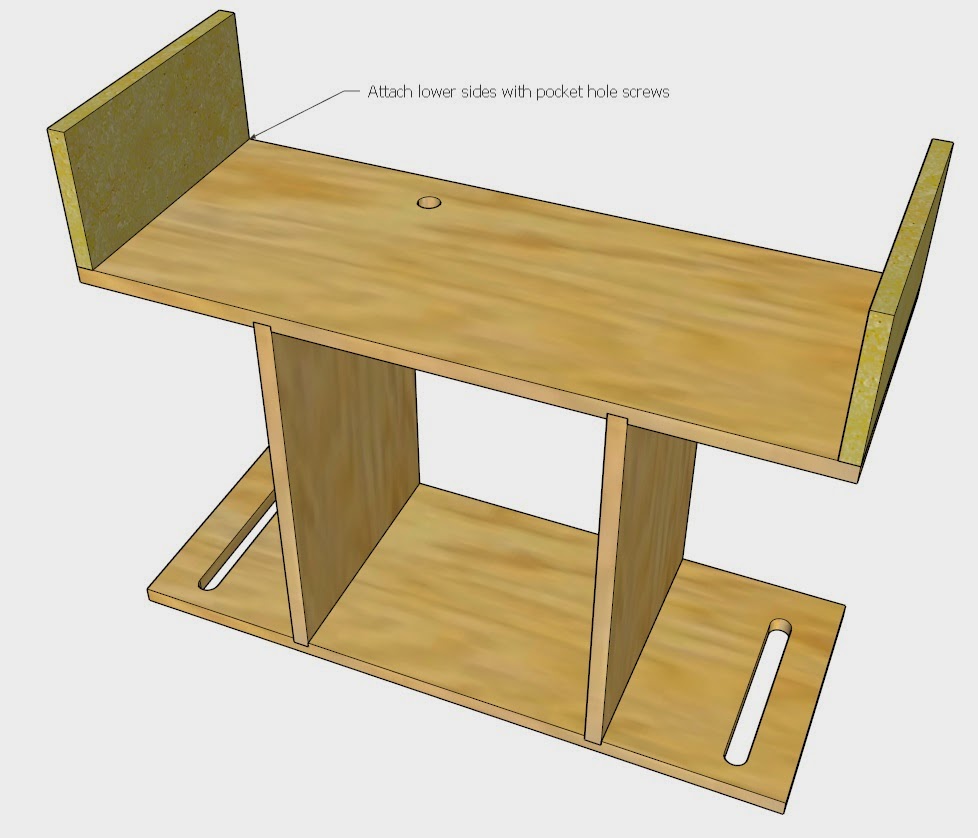
Step 7
While the unit is still upside down, place the bottom piece on and attach with 1 1/2" screws directly up from underneath the unit and into the lower side pieces. Apply glue for additional strength.

Final Thoughts
I attached my charging station to the wall using a french cleat. I am not a french cleat fan, but for this design I feel it is the sturdiest and safest solution.
I only put four slots for cordless tools because that is the number of cordless tools that I have. As you can see you can add at least one more slot with the current measurements as listed. If you tweak them a little you could probably add two additional slots. However, you would have to find somewhere else to put the power strip.
I drilled an additional one inch hole into one of the lower sides in order to pass the cord for the power strip through.
Finally, no the bottom does not sag without additional support from all the weight of the cordless tools. I even place tools in their slots loaded with batteries. If you are concerned that it might, you could always add center supports between each slot. However, mine has been in use for several years and I can confidently say that I have experienced no issues of any kind.
Find me on Facebook, Google+ and Pinterest. Also be sure to check out my YouTube channel for lots of great project videos. If you see any of these project designs that you would like to see a video for, let me know. If I get enough interest in one I will be sure to build and upload.
Until then,
Happy DIYing!!

Great post
ReplyDelete